
Installing your Vinyl Floor: Practical Tips
To validate your warranty, you need to complete the form on the warranty card and mail it back within 14 days of your installation. There are two parts, the first should be completed by the dealer with their details, it will also speak to allowable floor coverage and moisture readings. In the second part, you will accept the warranty conditions, maintenance and care instructions. You will send the completed form back to Finfloor and it will be filed for safe keeping.
Prior to installation, inspect planks in daylight for visible faults or damage. Check if sub-floor and the site conditions comply with the specifications described in the instructions. If you are not satisfied that they do, then contact your supplier, who will advise you on the best route to take. Do not risk installing your new floor under sub-optimal conditions and rather get the advice of a specialist.
Check the flooring panels before installing
The product has been manufactured according to the highest international standards and has undergone strict quality control, so in the unlikely event of you finding defects in any of the flooring panels, do not install them. Please send them back for a replacement or a full refund.
Check the sub-floor before installing
All sub-floors need to be dry, and clean. Make sure that the area has been swept and is free of all debris. If the area has been wet, make sure it is given sufficient time to dry before the installation.
- Wood sub-floors must be dry and well secured. Nailed or screwed every 15cm along joists to avoid squeaking. If not level, sand down high spots and fill low spots with a levelling patch. Make sure that all crawl spaces are open and have proper under floor cross
- Concrete subfloors must be fully cured, at least 60 days old, and are recommended to have a painted or 200-micron polyethylene vapour barrier between concrete and floor. Subfloor should be flat and level within 4.7mm per 3.3 meters. If necessary, grind high spots down and level low spots with a levelling compound.
- Ceramic tile, resilient tile and sheet vinyl must be well bonded to the subfloor, in good condition, clean and level. Do not sand existing vinyl floors, as they may contain asbestos.
Make sure you have the correct equipment on hand
You will need the following tools and equipment for the successful installation for your vinyl floor:
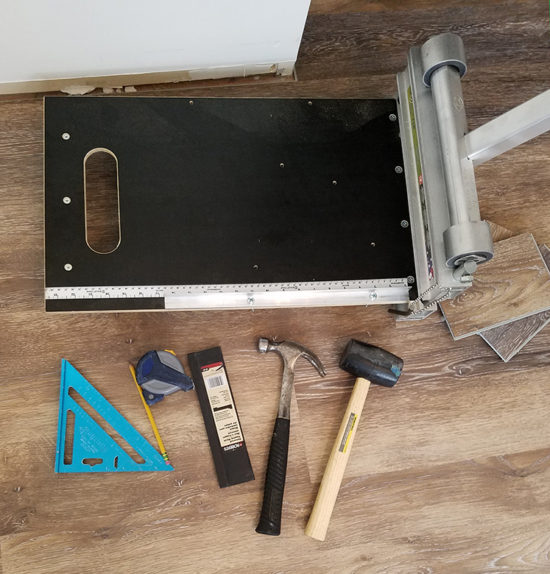
- Tape measure
- Tapping block (a trimmed piece of flooring)
- Pencil
- Heel iron / pry bar / pull bar
- Chalk line
- Crosscut power saw with speed adjustment/flooring guillotine
- 3M Scotch-Blue™ 2080 tape
- Rubber mallet